


Phil O'Keefe
-
Posts
85,666 -
Joined
-
Last visited
-
Days Won
263
Content Type
Profiles
Articles
News
Expert Reviews
Forums
Everything posted by Phil O'Keefe
-

Music Association Thread - Take 3
Phil O'Keefe replied to Dendy Jarrett's topic in Sound, Stage, and Studio
[video=youtube;ytRekLUX3GE] "Red Hill Mining Town" - U2 -
Music Association Thread - Take 3
Phil O'Keefe replied to Dendy Jarrett's topic in Sound, Stage, and Studio
[video=youtube;a_HpVbD1_Ao] "I'm Not The One"* - The Cars *I'm more like the and of 2... -
Music Association Thread - Take 3
Phil O'Keefe replied to Dendy Jarrett's topic in Sound, Stage, and Studio
[video=youtube;DHYkYYikewU] "Only A Memory" - The Smithereens -
Music Association Thread - Take 3
Phil O'Keefe replied to Dendy Jarrett's topic in Sound, Stage, and Studio
[video=youtube;ERWREcPIoPA] "Only The Good Die Young" - Billy Joel -
 Fender Redondo Classic An eye-catching acoustic with electric overtones by Phil O'Keefe Fender has been making acoustic guitars for quite some time, but for the most part they have not achieved the same level of success that Fender's electric guitars and amplifiers have. However, as they have done with their recently-released line of effects pedals, Fender has been taking steps lately to up their game in the acoustic guitar department. Proof of this can be found in the new Redondo Classic under review here. Part of Fender's California Series, it sets the bar a lot higher than any previous Fender acoustic guitar that I've tried. Let's take a look at the details. What You Need To Know Fender's California Series guitars are designed in and inspired by California, and are made in China. The line is divided into three distinct categories and price points - Player, Special and Classic - each with three models (the small-bodied Malibu, medium-sized Newporter and larger Redondo) but with different features and appointments at each level. There's a Redondo Player ($399 "street"), Redondo Special ($699 "street") and Redondo Classic, with the Classic being the top of the line. The Redondo Classic is the largest bodied instrument in the California Classic lineup, with a Fender-exclusive "slope-shouldered" body shape that's roughly dreadnought sized, but that has a slightly different shape than other dreadnoughts. The body also has a cutaway on the treble side, which helps improve access to the highest frets. The Redondo Classic is available in two colors - Hot Rod Red Metallic and Cosmic Turquoise, which is the color of the guitar I was sent for review. The Cosmic Turquoise isn't identical, but it did remind me somewhat of Fender's classic Lake Placid Blue color. It's a cool metallic color that will look great under stage lighting. While the Redondo Classic's top is painted, the backs and sides are finished in clear, which really shows off the wood. The body's finish is done using gloss poly. The Redondo Classic uses solid woods throughout - in addition to the solid sitka spruce top, the back and sides are made from solid mahogany. The top is braced using quartersawn scalloped X bracing. The soundhole rosette is made from koa, as is the binding used on the top and back of the guitar. The wood binding and rosette look quite classy and distinctive, without being overly gaudy. The Redondo Classic's pau ferro bridge uses what Fender refers to as a "Modern Viking" shape. The bridge saddle is bone, and is compensated for improved intonation. The bridge pins are ebony with mother of pearl dots. The mahogany neck has a 25.6" scale length. The Redondo Classic has 20 medium jumbo sized frets. The Redondo Classic's headstock uses the Fender six in-line tuner layout and headstock shape. It sports a gold Fender "spaghetti" logo and a single string tree to increase down pressure at the nut for the high B and E strings. The Redondo Classic features a glossy painted headstock that matches the color of the body's top - another classic Fender visual touch. The tuners are sealed nickel inline models that resemble vintage Klusons. The fingerboard is pau ferro, which is starting to show up on more and more guitars as an alternative to rosewood, which has become more increasingly regulated in recent years. It's a bit lighter in color than rosewood, has a slightly brighter tone, and feels a bit harder (similar to maple or ebony) than a rosewood board, but it's a good substitute that isn't too far away visually or tonally. Maple dots are used for the position marker inlays on the fretboard. You'll also find dots on the side of the neck, making it easier to keep track of your position as you're playing. The satin-finished neck joins the body at the 14th fret and has a very comfortable "slim C" profile. Neck width at the bone nut is 1.69" (43mm), and the fingerboard radius is a fairly flat 15.75". The sound of the built-in electronics don't let you down when it's time to plug in, and help make the Redondo Classic a fully stage-ready instrument. The built-in PM preamp was designed by Fender and Fishman. The Redondo Classic features an under-saddle piezo transducer, and the preamp is equipped with volume, treble and bass controls that are mounted on the side of the guitar. A "tuning fork" button turns on the onboard tuner, which displays on a small backlit screen. The screen has a simulated "needle" to show you how sharp or flat you are, and the color of the screen turns from blue to green when you get the note into tune. The output from the guitar's output jack is muted when the tuner is turned on. An additional switch lets you flip the output phase or polarity, which can be helpful in reducing feedback in some situations. The battery compartment and output jack are located next to the strap button at the end of the guitar, and the battery can be changed without reaching into the guitar or using any tools. The Redondo Classic comes with a very nice "deluxe" Fender FA-620 padded gig bag. The bag has reinforcing rubber "bumpers" in a couple of locations, along with wide padded straps, multiple pockets to hold your straps, picks, spare strings and other accessories, and there was even a soundhole style humidifier included in the one I was sent for review - a nice accessory, considering the importance of keeping a solid wood guitar properly humidified. Limitations The heel of the neck of the review unit is strangely shaded; it doesn't really match the color of the rest of the neck (or the back of the body), and there are some small fluctuations in shading here and there on the otherwise very cool looking koa binding. This may only be an issue with this specific guitar and not something you'll find on other examples of the same model. While they're fairly easy to figure out, especially for more experienced players, there were no instructions included on the use of the built-in electronics. While the pickguard-free Cosmic Turquoise top looks great, since there is no pickguard you're likely to get some pick scratches in the top of the guitar over time - especially if you're a heavy strummer. Conclusions Having been somewhat less than impressed with some previous Fender acoustics, I have to admit to being very pleasantly surprised by the Redondo Classic. The playing feel of this guitar is very electric-like, with its fast sleek satin-finished neck and flatter fingerboard radius. It's a very comfortable and easy guitar to play - especially by acoustic guitar standards. The cutaway also makes it easy to reach the upper frets. It doesn't disappoint sonically either, delivering big-voiced un-amplified acoustic tones that easily compete with anything in its price range. And it came well set up and ready to play right out of the box, requiring no adjustments whatsoever. That's always appreciated, although the shading of the neck heel was somewhat disappointing - hopefully that is just a one-off issue that applies only to this specific guitar. The overall look of the Redondo Classic is obviously a matter of opinion, but I think it's a striking looking guitar without being overly flashy. With its onboard electronics and distinctive visual appeal it would be right at home on stage, but it's acoustic tone makes it suitable for home practice and recording purposes too. Whether this is your first acoustic or one you're considering as a step up from a beginner's guitar, or even if you're a seasoned player who just wants a reasonably affordable all-solid wood guitar, you'll be impressed with what the Redondo Classic has to offer. This is the nicest Fender acoustic that I've ever played - it's an impressive instrument. If you've been less than impressed with some of Fender's previous offerings, you should check out the new Redondo Classic - it's definitely a significant step up, and shows that Fender is serious about upping their game in terms of their acoustic guitar offerings. -HC- Want to discuss the Fender Redondo Classic or have questions or comments about this review? Then head over to this thread in the Acoustic Guitar forum right here on Harmony Central and join the discussion! Resources Fender Redondo Classic ($799.99 "street") Fender's product web page You can purchase the Fender Redondo Classic from: Sweetwater Guitar Center Musician's Friend Direct from Fender __________________________________________________ Phil O'Keefe is a multi-instrumentalist, recording engineer / producer and the Senior Editor of Harmony Central. He has engineered, produced and performed on countless recording sessions in a diverse range of styles, with artists such as Alien Ant Farm, Jules Day, Voodoo Glow Skulls, John McGill, Michael Knott and Alexa's Wish. He is a former featured monthly columnist for EQ magazine, and his articles and product reviews have also appeared in Keyboard, Electronic Musician and Guitar Player magazines.
 -
Music Association Thread - Take 3
Phil O'Keefe replied to Dendy Jarrett's topic in Sound, Stage, and Studio
[video=youtube;Gva5QAZDgiA] "Good Day In Hell" - The Eagles -
Music Association Thread - Take 3
Phil O'Keefe replied to Dendy Jarrett's topic in Sound, Stage, and Studio
[video=youtube;XQo5tqwAwgE] "Good Company" - Queen -
Music Association Thread - Take 3
Phil O'Keefe replied to Dendy Jarrett's topic in Sound, Stage, and Studio
[video=youtube;A32NKnpSONU] "Cry To Be Found" - Del Amitri -
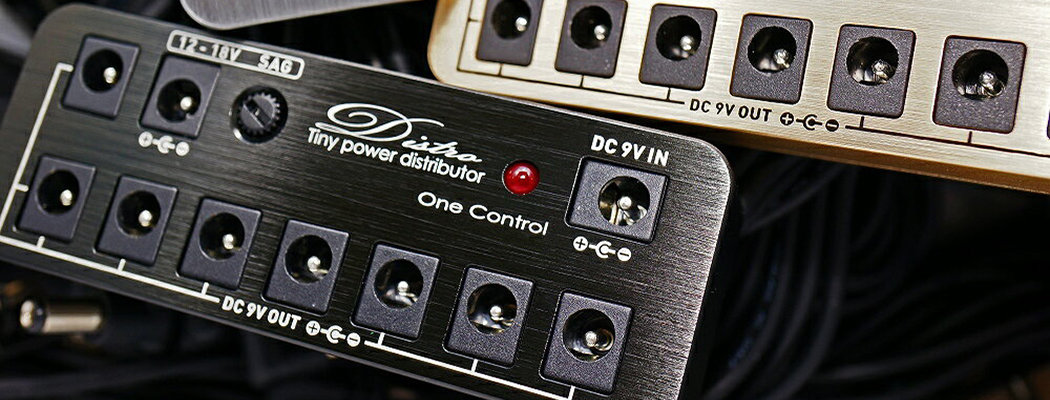 One Control Micro Distro Pint-sized powerhouse by Phil O'Keefe If there's one thing that everyone who uses effects pedals needs, it's a way to power them. Sure, the option to use batteries is there - at least with many pedals - but not all pedals can be battery-powered. There are also the hassles that come along with batteries, which anyone who has had one die in the middle of a gig will be all too familiar with. Plus there are environmental concerns too, not to mention the cost - if you have a board with a half-dozen or more effects pedals on it, the cost of replacing your batteries for home practice, band rehearsals and gigs can add up - fast. Because of this, many players opt for external power supplies, but using individual power adapters for each pedal brings its own share of hassles, from having enough room on a power strip to plug them all in, to the amount of space such a setup requires on your board. So what other choice do you have? Probably one of the best options is to use a single power supply that can power more than one pedal at a time. That's precisely what the One Control Micro Distro is all about. What You Need To Know The Micro Distro comes in two versions - the "all in one pack" under review here, and a second version that only includes the Micro Distro unit itself. The Micro Distro is a very small unit (the main "Distro" housing measures only 3.85" W x 1.38" D x1.89" H and weighs 4.48 ounces) that is designed to power up to nine pedals simultaneously. The Micro Distro is available in three colors - black, shiny silver and fairy pink. Hey, I didn't make up the names - I just report 'em! The main power distributor's small size means it will take up very little physical space on your pedalboard. The housing of the Micro Distro is made from aluminum; not only is it small, but it's relatively lightweight, and yet it feels rugged and tough. The size of the cardboard box that the Micro Distro comes in is somewhat misleading - you'd think it would contain a much larger unit; however, the box size needs to be considerably larger than the main Distro unit itself because of everything that One Control includes along with the Micro Distro. Not only do you get the main distribution unit, but also a separately boxed external AC adapter, as well as a bunch of power cables that you plug into the Micro Distro at one end, and into your various pedals at the other. The Micro Distro package comes with nine DC cables of varying lengths for powering your pedals: One shorter DC-15-LS cable, which is 15 centimeters long, three DC-30 LS cables, which are 30 cm long each, three DC-50 LS cables, which are 50 cm long, and two DC-70 LS cables, which are 70 cm long. Additional cables are available separately in the event you need more of a particular length, or need a replacement for a lost or damaged one. All of the included cables have a right angle 5.5mm x 2.1mm plug (the industry standard "Boss-size" plugs) at one end and a straight plug of the same dimensions at the other. All of the power I/O on the Micro Distro is wired center-negative; again, following the industry standard. The included AC adapter can work with anything from 100V-240V at 50-60Hz, although the wall plug itself is not interchangeable - it came with a plug that's compatible with US-style wall power outlets permanently affixed to the adapter. The adapter has a 2A @ 9V DC output that you plug into a dedicated power input jack on the Micro Distro to power it, and by extension the pedals connected to the Micro Distro. The Micro Distro has eight jacks that each provide 9V DC. In addition to the 9V power output jacks, you also get an additional jack that can supply anything from 12-18V DC. This outlet has a small "Sag" control knob that lets you adjust the output voltage. The power from the 2A power supply is distributed to the outputs, and short of the overall 2A limit, there is no limit on the amount of current any one 9V outlet can supply, although the 12-18V output is limited to only 50mA; as long as you don't exceed 2A of total current draw, you're good to go. You can plug the included AC adapter into a power strip on your board (the best approach if you have other pedals that require their own separate power supply units), or directly into a wall outlet or extension cord. You can combine two Micro Distro units to power boards with more pedals (up to 17) than can be powered from a single Micro Distro unit. As long as your total power requirements don't exceed 2A, both Distros can be powered by a single AC adapter. One Control sells additional Distro units (without an AC adapter or the nine connecting cables) and power cables separately. The Micro Distro has an Auto Shutoff Mode. If the unit is overloaded and you attempt to draw more than the rated 2A of current from it, it will shut itself off. Removing it from the AC outlet and allowing it to cool for a while should reset it. Limitations The outlets on the Micro Distro are not isolated. However, I experienced no grounding issues or hum while testing it with a large variety of different pedals from multiple manufacturers. The 50mA current draw limit for the 12-18V output is rather restricting - many 12-18V pedals will require more current than this to operate properly. While the higher-voltage output can be set for anything from 12 to 18 volts, there are no markings or detents to indicate where those voltage settings are on the "Sag" control - you may need to use a digital multimeter to insure you are sending your pedal the correct voltage - this is particularly important to do if your pedal has a "do not exceed" voltage that is less than the 18V maximum setting on the Sag control. Conclusions Sized about the same as many micro pedals, you'll appreciate the Micro Distro's very compact dimensions - especially if you have very little space available on your pedalboard. But size alone isn't going to matter if the power supply doesn't work reliably, or if it causes ground issues with your rig. Fortunately I experienced no issues with either reliability or hum - the Micro Distro does its job quietly, effectively and reliably. While the 12-18V output may lack sufficient amperage for some higher-voltage pedals, and there's no setting marks for different voltages on the dial, the higher voltage output is still nice to have for those pedals that are compatible with it - after all, not all pedals run on 9V! Plus, you can use it to "starve" some pedals - some overdrives and fuzzes can give different sonic results that you may find appealing when supplied with less than full voltage. Being able to stack two Micro Distro units and power up to 17 pedals from one AC power supply is another useful feature that those with larger pedalboards will appreciate. All in all the Micro Distro is a pint-sized powerhouse that is capable of powering some pretty large boards without issues or hassles - it's definitely a worthy candidate for general pedalboard powering purposes. -HC- Want to discuss the One Control Micro Distro pedal power supply or have questions or comments about this review? Then head over to this thread in the Effects Forum right here on Harmony Central and join the discussion! Resources One Control Micro Distro Pedal Power Supply ($220.00 MSRP, $175.00 "street", additional Distro units sans adapters and cables sell for $135 "street") One Control's product web page You can purchase the One Control Micro Distro from: Sweetwater Adorama Amazon B&H Photo Video __________________________________________________ Phil O'Keefe is a multi-instrumentalist, recording engineer / producer and the Senior Editor of Harmony Central. He has engineered, produced and performed on countless recording sessions in a diverse range of styles, with artists such as Alien Ant Farm, Jules Day, Voodoo Glow Skulls, John McGill, Michael Knott and Alexa's Wish. He is a former featured monthly columnist for EQ magazine, and his articles and product reviews have also appeared in Keyboard, Electronic Musician and Guitar Player magazines.
 -
Music Association Thread - Take 3
Phil O'Keefe replied to Dendy Jarrett's topic in Sound, Stage, and Studio
[video=youtube;DXg6UB9Qk0o] '"Cry Me A River" - Julie London -
Music Association Thread - Take 3
Phil O'Keefe replied to Dendy Jarrett's topic in Sound, Stage, and Studio
[video=youtube;8Zeyej5bfZE] "Cry Baby Cry" - The Beatles -
 TASCAM Model 24 24 Channel Multitrack Recorder with Integrated USB Audio Interface and Analog Mixer by Phil O'Keefe Right off the bat, and in the interest of full disclosure, I should mention that Harmony Central is owned by Gibson Brands, who (last I heard) also owns a partial interest in TASCAM. My history with TASCAM products goes way back; like most people who started recording in the '70s, I've been using their products for decades. I remember when the first TASCAM Portastudios were hitting the market in the late 1970s. They were groundbreaking units that delivered multitrack recording to the musical masses in an affordable way for the first time; combining a small mixer with a basic four track recorder, they brought together the basic tools needed for tracking, overdubbing and mixing in a relatively compact and portable unit. I spent countless hours recording songwriting demos using a TASCAM Model 246 Portastudio that I purchased back when they were first released. Fast forward to today. DAWs are nearly everywhere, and even inexpensive computers (not to mention smartphones and tablets) allow musicians to do complex, multi-channel recordings. But some of the immediacy and responsiveness and tactile interaction with traditional hardware has been largely lost. Some musicians don't consider this to be progress since they'd rather be spending time making and listening to music rather than having to mess with computer settings and staring at a computer screen. While the latest product from TASCAM - the Model 24 under review here - doesn't totally eschew the modern approach to recording, it does bring back some of that hands-on, all in one approach that made those early Portastudios so popular, and that helped teach a generation the basics of recording and mixing…. What You Need To Know Combining a 22 channel analog hardware mixer, a 24 track (22 tracks plus stereo mixdown) multitrack recorder, and a 24x22 USB computer audio interface into one unit, the TASCAM Model 24 is a hardware unit that takes a decidedly old-school approach without totally abandoning modern recording tools and methods in the process. In addition to the mixer, the TASCAM Model 24 is also a standalone 24 track multitrack recorder, as well as a audio interface for your Mac or PC computer, but at first glance the TASCAM Model 24 appears to be just a fairly traditional, although stylish looking mixer, with an emphasis on a retro visual vibe. The side ends of the mixer have faux wood end caps (complete with TASCAM logos) that can be removed if you wish. With them it place the Model 24 measures 22.68" W x 20.20" D x 4.62" H (576mm x 513mm x 117.4mm) and it weighs in at 22 pounds (10kg). With the exception of the IEC power connector and power on/off switch, and the USB 2.0 jack, there's nothing on the rear panel except for the TASCAM logo. All of the I/O is mounted on the top panel where it can be easily reached by the operator. There are four different input channel configurations on the mixer, with each offering different features and capabilities. Mixer channels 1-2 are the most fully-featured of the twelve mono input channels. Each of these channels has a mic / line / instrument input with a switch to set the channel for DI instrument use. There is 50dB of gain available from the mic preamp. A 100Hz high pass filter is also included. The line inputs are in the form of balanced 1/4" TRS jacks, and up to 40dB of gain adjustment is available for the line inputs. 48V phantom power is available for all 16 mic preamps on the Model 24, but it's an all or nothing proposition - a single button near the upper right side of the board turns it on or off for all of the mic preamps simultaneously. You can get a loud pop when engaging or disengaging it, so TASCAM cautions you in the well-written user's manual to mute and turn things down before doing so. Each channel has a SIG LED that lights up green when signal levels greater than -56dB are present at the input, and will flash red when the signal input levels are too hot or the Gain control is set too high. (Right click and select "open image in new tab" for a larger view) Right below the mic preamps, you'll find the very important Mode or source switches. These set the input source for the channel, and have three positions. These switches must be set correctly, depending on how you want to use the Model 24. There are settings for Live, Direct/PC USB, and MTR. Live is used for bringing in mic or line input sources (such as when using the Model 24 as a mixer), while the Direct/PC USB position is selected when using the Model 24 as a computer USB audio interface for DAW recording. The MTR setting is used when you want to record and play back material to and from the built-in multitrack recorder. In MTR mode, the Model 24 automatically switches between the incoming mic or line input (when recording) and sound from the recorder when playing back. When doing punch-ins, it gives you a mix of the track playback and input source, so you can play along prior to the punch point. A single knob compressor is included on channels 1-12. As it's turned up higher the threshold seems to lower and you get more compression overall. A LED on each channel illuminates when compression is actively being applied. The compressor is well-suited to light to moderate compression when tracking; attack and release are program-dependent, but neither is particularly fast. Channels 1-12 each have a three band EQ section with a sweepable peaking midrange band. The high and low shelving EQ bands are centered at 12kHz and 80Hz, while the midrange can be swept from 100Hz to 8kHz; when the knob is at the center position, it's set to 700Hz. The EQ controls all have center detents, but there is no EQ bypass button. Each EQ band has a boost / cut range of 15dB. There are three aux sends on the Model 24. Monitor 1 and Monitor 2 are pre-fader sends, while the FX send is post-fader. There are hardware output jacks for all three sends. Alternately, the FX send can be used with the Model 24's built in effects unit. A Pan pot on each of the mono input channels allows you place the sound anywhere in the stereo sound field that you wish. When centered, signals are reduced by -3dB and go equally to the left and right channels of the main stereo output. Hard panning to either side will result in the signal being sent only to that side (left or right) of the main stereo bus output, and / or the Sub output, if that is selected. Each channel has a 100mm fader. These feel smooth and I appreciate their longer throw - it's nice that TASCAM opted for these instead of 60mm faders. The fader caps for the input channels are white. Near the faders you'll find buttons for Record (used with the internal SD card multitrack recorder), channel Mute, and assignments to the Main stereo bus as well as the Model 24's secondary Sub stereo bus. There is also a PFL (pre-fader listen) button, allowing you to solo selected track(s) to hear them separately when checking for problems. Whenever any PFL or AFL button on the board is depressed, a red LED near the mixer's small data screen lights up to let you know. The Record button itself illuminates red when selected, giving you a clear indication as to which channels are record enabled. An orange LED next to the Mute button lets you know when a channel is muted. Mixer channels 3-12 are also mono inputs, and they are nearly identical to inputs 1 and 2, but lack the inserts for connecting outboard processors, as well as the instrument buttons; they're mic / line inputs only, and aren't intended for use as high impedance instrument inputs. Outside of that, they have all of the rest of the features you'll find on input channels 1 and 2. Mixer channels 13-20 are different than the previous channels in some significant ways. First of all, each of these channels can be used as stereo input; they're paired as channels 13/14, 15/16, 17/18 and 19/20, with a single fader and set of EQ and aux controls for each pair. They can be used as mono inputs instead if you'd like, and they even have mic preamps, but there's only four - one for each channel pair. This gives the Model 24 a total of 16 mic preamps. The line inputs for these channels are on 1/4" balanced TRS jacks, with two of them for each stereo channel. Channels 13-20 lack the single knob compressors of channels 1-12. Their EQ is a bit different too. You still get the 80Hz and 12kHz shelving EQ bands, but they lack the sweepable midrange of the equalizers on the first twelve channels; their peaking midrange control is fixed at 2.5kHz with a +/-15dB boost / cut range. Mixer channels 21-22 give you another stereo input, but with both 1/8" TRS and left / right inputs on -10dBV RCA jacks, it's designed to accept the audio output from smartphones and tablets, among other things. You can connect to Bluetooth-equipped devices using the Model 24's built-in Bluetooth 4.0 interface; a pairing button and corresponding LED can be found below the inputs, in the place where the EQ is located on the other channels. You'll also find a useful On/Mute button for the Bluetooth source here too. There is no EQ on channels 21-22. There is also no Gain control and SIG LED, no mic preamp, and no compressor either; you do get the two Monitor send controls, but not the FX send. The Record button, Main and Sub bus assignment switches, PFL and mute switches, along with the main fader are the same as on all of the other channels. The Model 24's mixer has a couple of other notable features, including a stereo seven-band graphic equalizer. This can be assigned to the main hardware output jacks, or to the Monitor 1-2 output jacks, which is useful when using the Model 24 as a live performance mixer. You also get a built-in effects processor. It has 16 different algorithms - twelve single effects (delays, reverbs, chorus and flange) as well as four that combine delay or chorus and different reverbs together. The effects unit has a dedicated mute switch, as well as separate knobs for controlling the amount of signal from the effects processor that is sent to the two monitor sends, and to the main stereo bus. One parameter for each algorithm can be adjusted - the parameter type depends on the algorithm selected; for example, for the reverbs it is decay time, for the delays it's regeneration, for chorus it's depth, etc. The digital effects sound clean and are certainly useful; live performers in particular will appreciate having them available, and you may find them handy for home recording too, especially if using the Model 24 as a modern-day standalone Portastudio. They're comparable in quality to what you'll find on some competing live mixers, although they really can't compare to high-quality DAW plugins. The main output faders include one with a gray fader knob for the stereo Sub bus, as well as one with a red fader cap for the main stereo output bus. There are also two mono master faders for the Monitor sends and these have orange fader caps. The Sub can be assigned to the main stereo bus by depressing a switch, and all of the master faders have their own Mute switch and LED; Monitor 1-2 each have an AFL switch too. The output jack section of the Model 24 is top-mounted near the upper right corner of the board. It has XLR jacks for the Main stereo outputs, as well as a pair of 1/4" TRS jacks for Control Room outputs. The Control Room outputs have their own level control. 1/4" balanced TRS output jacks for the three aux sends are also provided. When using the FX Aux output jack, the signal to the internal effects unit is bypassed. A 1/4" TRS stereo headphone jack is also included, and it has its own level control. The built-in recorder can record up to 22 tracks, plus a stereo mixdown track. A dedicated button allows you to assign the stereo mixdown track to the main stereo bus fader for playback purposes. All recording, track deletion and auto punch in/out operations can be undone, but you only get a single level of undo, so you can't undo something you did three steps back. You can also redo an undone operation if you change your mind. The SD card slot is located on the top of the unit, just above the main L/R LED meters. It has a rubber cover to help keep dust and debris out. The Model 24 can use 512MB-2GB SD cards, 4-32GB SDHC cards or 64-128GB SDXC cards. The file system is FAT16 for SD cards, FAT32 for SDHC cards and exFAT for SDXC cards. Cards need to be formatted on the Model 24 before use - you can't just use pre-formatted cards. Regardless of the card type you use, it must be Class 10 or faster in order to work properly. Files are recorded in WAV format, and WAV and BWF (Broadcast WAV) file types can be exported and imported. Cards can be taken from the SD slot and read directly using a computer with a card slot on it; tracks can be transferred this way too. A basic set of backlit Transport buttons is included for the built-in multitrack recorder. A small built-in screen provides meters for the recorder and input channels. It's also used for formatting the SD cards and creating songs - both of which need to be done before you can record using the internal recorder. You'll also need to access the menus for setting the system date and time, adjusting the display brightness, as well as when selecting, deleting, protecting and renaming songs. It's also used in conjunction with the built-in effects processor for algorithm selection and parameter edits. A Multi-Jog control allows you to scroll through menu options, and you can select the desired ones by pressing on it. A series of four buttons below the display allow you to select various options as well. You'll probably won't use the screen and menus all that often - certainly not compared to using a computer to record to - but it's very intuitive and quick to use when you do need to access it. Speaking of meters, the mixer also has a pair of 12-segment multicolored LED ladder meters for the main stereo output bus. Automated punch in and out of recording can be set up using the screen, as well as looping a section for repeat playback. A footswitch jack is provided, and a user-supplied footswitch can be used for punching in / out manually. The Model 24 can be set to work with any type of momentary (non-latching) footswitch, regardless of polarity. While all channels can be recorded simultaneously, punching in and out is limited to a maximum of 8 channels at a time. The footswitch can also be set up for play / pause operation instead of for punching. At first I thought there was going to be no way to mix various channels together and route them to other channels / tracks for re-recording, sub-mixing or "bouncing" tracks, but then it dawned on me that the built-in Sub bus is ideal for this. Since each of the MTR playback channels can be assigned to the two 1/4" Sub outputs (instead of, or in addition to the main outputs and the USB bus), all you need are a couple of short 1/4" TRS cables; plug the cables into the one or two of the Sub outputs, assign the tracks you want to bounce to the Sub, and record to whatever unused channels / tracks you patched the cables into. When you're connected to a computer with a user-supplied USB 2.0 cable, a green LED next to the Model 24's data screen lights up to let you know. As an audio interface, the Model 24 supports both Mac and PC computers. You'll need to be running Windows 7 SP1 or later (up to Windows 10) and both 32 and 64 bit versions of Windows are supported. On the Mac you'll need to be running 10.11 (El Capitan) or later; High Sierra (10.13) is also supported. Both Macs and PCs need a 2.0GHz processor or faster, a free USB 2 port, as well as at least 2GB of RAM. Core Audio on the Mac is supported, as well as ASIO 2.0 and WDM on PCs. I did my testing using a i7 quad core Mac Mini with 16GB of RAM running El Capitan, and setup and operation were both smooth and trouble-free. Like the recorder, the audio interface can be used at 16 or 24 bit resolution with either a 44.1kHz or 48kHz sample rate. TASCAM's marketing doesn't really make this clear; it mentions only 24 bit / 48kHz operation, but that's just the maximum - the other rates mentioned are also fully supported, although higher (88.2kHz / 96kHz) sample rates are not. Limitations This is an analog mixer. There are no motorized faders, there is no DAW control surface capabilities, and no digital I/O beyond the 24 x 22 USB interface and the Bluetooth connectivity on channels 21-22. Outside of automated punch in/out, there is no automation for things like panning or level changes outside of whatever you might apply using your DAW. There are no alternative tracks or track layers for the built-in multitrack recorder. You can't move a recording from one track to another without either transferring it out to a computer and bringing it back on a different track, or by bouncing it using the Sub outputs and patch cables and re-recording it to a different track (or pair of tracks). While using the Sub bus this way means another pass through digital converters and the analog input stage(s), the end results of track bouncing sound clean and are quite usable - much more so than bounces done back in the days of the first cassette-based Portastudios. When recording yourself to the internal recorder it's hard to use the most fully-featured mixer channels (1-2) as your main inputs since there's no way to easily route them to other recorder tracks. Be prepared to regularly do some manual patching if you record solo. When using the Model 24 as a audio interface for a DAW, this limitation doesn't apply, since you can create multiple tracks in the DAW and have them sourced from those same two inputs, and overdub to them one or two at a time as needed. The compressors can only be used on mic / line input sources and don't work on the returns from your DAW or playback channels for the built-in recorder. The graphic equalizer can not be assigned to individual mixer channel(s), playback tracks, or to the main bus stereo recording tracks, only the main stereo output jacks or the Monitor output jacks. Conclusions I really like the retro look of the Model 24; it takes me back to some of those early TASCAM mixers of my youth. The color coding of the various knobs isn't just retro though - it helps you to see things on the board much more easily, and yes, it looks cool too. But this isn't just an old-school analog mixer; it combines a very capable analog mixer with a modern digital multitrack SD card recorder, making it a true heir to the Portastudio legacy. Toss in a fully capable multichannel USB 2.0 computer audio interface and it's clear that modern recording capabilities were not neglected when TASCAM was designing the Model 24. And it's a very good sounding unit overall too. The mic preamps don't have as much gain as many outboard preamp models and aren't really suitable for use with most low-output ribbon mics, but they're relatively clean and neutral, without too much noise. The EQ is a very good tone shaper; it's less suitable for more surgical processing, such as notching out a 60 cycle hum, but it's great for general purpose use, and EQ is something that most audio interfaces omit entirely. Using the Model 24 as a live mixer and being able to record the band simultaneously will appeal to many users, and it can function fine in that role as long as the amount of input channels and general connectivity and features of the board are sufficient for your needs. It's also great when serving as a modern-day Portastudio, although it would be nice if there was a way to easily transfer tracks to different channels internally or assign the first two mixer inputs to other recorder tracks without resorting to file export / import or analog track bouncing using the Sub bus. The Model 24 excels as a computer audio interface, and gives you not only a wealth of mic / line inputs (two with inserts), but also the single knob compressors and full three-band EQ - both of which are features that most other audio interfaces lack. The Model 24 offers impressive flexibility at a reasonable price. Whether you need a traditional analog mixer for live gigs, a USB 2.0 computer audio interface with lots of inputs, mic preamps compressors and equalizers for recording, or want a modern-day version of the classic Portastudio - a portable, self-contained multitrack recorder / mixer that you can take to gigs or rehearsals or use for home recording, it's got you covered. The Model 24 would be an excellent choice not only for pro recording engineers and live sound mixers, but also for someone who seriously wanted to learn about recording and mixing audio. You get a very capable mixer that can be used for live performances, and you can simultaneously record the gig too, without having to bring a computer along. Everything is laid out before you in a logical manner - if you've ever used an analog hardware mixer or a Portastudio, you'll feel right at home in no time. Using the mixer along with the built-in multitrack recorder for recordings helps you to think a bit more like we did back in the 1970s and 1980s - you're forced to listen instead of making judgements based on what you see - which is great for ear training! It's also great for focusing on your playing chops instead of your computer editing skills. And when you do need to go to a DAW for an edit, or when you want an audio interface for your computer, the Model 24 can handle that too - no need to upgrade it or add something else to your rig. The TASCAM Model 24 really does have a nice combination of features and capabilities, and at this price (which is less than I paid for my six channel, four track TASCAM 246 Portastudio back in the 1980s), you get a lot for your money - it's bound to be a successful product for TASCAM. A lot of people are really going to love the TASCAM Model 24. I certainly have enjoyed using it. -HC- Want to discuss the TASCAM Model 24 or have questions or comments about this review? Then head over to this thread in the Studio Trenches forum right here on Harmony Central and join the discussion! Resources TASCAM Model 24 Multitrack Live Recording Console ($1,299.99 MSRP, $999.99 "street") TASCAM's product web page TASCAM Model 24 specifications TASCAM Model 24 owner's manual (PDF file) You can purchase the TASCAM Model 24 Multitrack Live Recording Console from: Sweetwater Guitar Center B&H Photo Video Full Compass Musician's Friend __________________________________________________ Phil O'Keefe is a multi-instrumentalist, recording engineer / producer and the Senior Editor of Harmony Central. He has engineered, produced and performed on countless recording sessions in a diverse range of styles, with artists such as Alien Ant Farm, Jules Day, Voodoo Glow Skulls, John McGill, Michael Knott and Alexa's Wish. He is a former featured monthly columnist for EQ magazine, and his articles and product reviews have also appeared in Keyboard, Electronic Musician and Guitar Player magazines.
 -
Music Association Thread - Take 3
Phil O'Keefe replied to Dendy Jarrett's topic in Sound, Stage, and Studio
[video=youtube;XaoHbNNK58k] "Fountain Of Sorrow" - Jackson Browne -
Music Association Thread - Take 3
Phil O'Keefe replied to Dendy Jarrett's topic in Sound, Stage, and Studio
[video=youtube;cDfEBmjtkAQ] "Valley Winter Song" - Fountains Of Wayne -
 Fender Effects Pedals Part 3 In the third (and final?) part of this three-part review, we check out The Pelt Fuzz, Engager Boost and Full Moon Distortion by Phil O'Keefe Fender's pedal history has been pretty hit and miss over the years - while there have been a few very popular Fender effects, they've certainly had more success with their amps and guitars. But Fender's been making a serious effort to up their pedal game as of late, and as we've seen in the previous parts of this multi-part review (click here to check out part one with the Level Set Buffer, Pugilist Distortion and Marine Layer Reverb, and you can find part two with The Bends Compressor, Santa Ana Overdrive and Mirror Image Delay right here) they released some very cool pedals when they launched their new line. But they weren't finished; three new pedals were added since the first batch of six was introduced, so in this review we'll be checking out the new Engager Boost, Full Moon Distortion and The Pelt Fuzz. What You Need To Know These are all-new designs that were developed by Fender, and they are not clones of any other pedals. Like most of the other pedals in the lineup, all three pedals under review here were designed by Fender VP Stan Cotey. All the pedals in the new series have several features in common, so we'll look at those features first before diving into the details of the individual pedals. Housed in relatively lightweight yet quite sturdy anodized aluminum enclosures (silver for the Engager Boost, blue for the Full Moon Distortion that's a bit different shade than the blue used for the Mirror Image Delay, and purple for The Pelt Fuzz), the new pedals look cool and should hold up to the rigors of touring and live gigs. All of the pedal graphics and labels are done in high contrast white lettering, making them relatively easy to see - even against the silver housing of the Engager Boost. Both the Engager Boost and The Pelt Fuzz are in smaller enclosures that measure 2.75" W x 2.5" H x 4.9" L and weigh .9 lbs each, while the Full Moon Distortion is in a larger-sized case that measures 3.75" W x 2.5" H x 4.9" L and weighs 1.2 lbs. The input and output jacks of all three pedals are side mounted. The jacks are oriented so that the plugs won't get in the way of the plugs of the pedals placed next to them, allowing for tighter placement on your pedalboard. Input impedance is 1M Ohm, while the output impedance is >10k Ohm. This applies to all three new pedals, as well as the rest of the new Fender pedal lineup. The pedal active lamps are smaller versions of the classic Fender jewel lamps that you're probably familiar with from their amps. Each pedal uses a different colored lamp to make identifying them easier, even in the dark. The Pelt Fuzz has a purple lamp, the Engager Boost has a white one, and the Full Moon Distortion has a blue jewel. The LEDs in the three newest pedals are not as bright as some of the previous pedals, but they're still plenty bright enough to let you know when the pedals are on. All three pedals have illuminated indicators on the controls so that you can always see how your knobs are set. These can be bypassed with a switch on the back of the pedals, which lowers the amount of power the pedals draw and is helpful if you're running them off of batteries instead of using an AC adapter. Power can be provided with either a 9V battery or an external power supply, but neither one is included, so you'll need to provide your own. Industry-standard 2.1mm center-negative power jacks can be found on the rear of all three pedals. You'll find the battery compartment at the front end of each pedal, and it is accessed through a spring-loaded, hinged door that's permanently attached. It magnetically latches, so you don't need any tools to open it, and you can do it without even removing the pedals from your board, which can be a lifesaver if you have a battery die in mid-gig. There is a red LED on the battery compartment door that lights up when the battery is dying, which makes it even less likely you'll have one die right in the middle of a song at a gig. The current draw of each pedal varies; in all cases, it's lower if you shut off the illuminated indicators on the control knobs. The Engager Boost and The Pelt Fuzz require 30mA, or 50mA if you have the lights for the knobs turned on, while the Full Moon Distortion draws a bit more current, and needs 80mA with the LEDs turned off, or 110mA if you have the knobs lit up. Unplugging from the input jack will turn off the battery, so make sure to do so whenever you're not using the pedal to conserve juice and help your batteries last longer. The Engager Boost is a clean style boost pedal. It has the Level control that you'd expect, and it gives you up to 20dB of clean boost; while it provides clean gain, it can still be used to drive an "on the edge" tube amp into distortion. It also has a few other pleasant surprises in the features department too. Fender gave the Engager Boost a full three-band EQ section, with individual Treble, Bass and Middle (midrange) controls. Each of the three tone controls can boost or cut, and each has a range of +/-12dB, making the Engager a powerful tone-shaper too. There is also a Frequency toggle switch that switches the center frequency of the Middle control from 400Hz (in the down position) to 800Hz in the up position, giving you even more EQ flexibility. In addition to the LED on/off switch for the knob indicators, the rear of the Engager Boost has a second slider switch that lets you choose between true bypass or buffered bypass switching. In the buffered bypass mode, a high quality buffer is engaged when the pedal is bypassed, giving you low output impedance and allowing for longer cable runs and pedal chains without signal loss or degradation. The Pelt Fuzz is a silicon transistor-based fuzz pedal with a lot of versatility; It is capable of making a lot of different types of fuzz sounds. The Pelt has a Fuzz control that sets the amount of fuzz and saturation. It can actually get fairly clean at low settings on the dial, but goes to heavy fuzz at the opposite end. In between are a variety of semi-overdriven and lightly to moderately fuzzed tones that can be well worth exploring. Of course you get a volume Level control too, so you can set the overall output level independently from the amount of grit. A Tone control lets you adjust the high frequencies to your tastes, giving you the ability to roll off some of the fuzz's spit and splatter if you wish. The Bloom control is rather interesting. It adjusts the pedal's attack characteristics, and gives you a smoother attack at low / Soft settings and a more gated, splatty sound at high / Hard settings. This can change the character of the fuzz quite a bit and lets you cover a lot of fuzz territory with just this one pedal. In addition to these four knobs, a pair of toggle switches provide even more options. The three-position Mid switch lets you leave your mids alone (middle position) or boost (up position) or cut (down) the midrange, while the two-position Thick switch gives the fuzz a much bigger and deeper sounding bottom end when it is in the up position. The "heavy hitter" in the new Fender effects lineup is the Full Moon Distortion. This is a much harder, beefier and meaner sounding pedal than the Santa Ana Overdrive or even the Pugilist Distortion, and the number one pedal in the new lineup that hard rock and metal players really need to check out. The Gain control has a lot of gain on-tap, and leaves no doubt that this is a Distortion pedal with a capital D. Of course there is a Level control so you can turn it down and get those heavy tones at softer volumes, but who would want to do something like that? This pedal invites you to rock out and bang your head at full throttle, full volume… and it sounds great when you do, although it's equally adept at creating more modestly distorted rhythm tones too. A four knob EQ section gives you plenty of control over the tone. In addition to fairly traditional Treble, Middle and Bass controls, the Hi-Treb(le) knob acts sort of like a sizzle control, and lets you adjust the amount of sparkle and sizzle in the distortion. Further versatility comes from the two toggle switches. The first is labeled Texture, and it lets you choose between symmetrical and asymmetrical clipping, which changes the character and harmonic content of the distortion, while the Bite switch reduces the lows a bit and gives you even more high-frequency distortion that makes the sound more present and, well, biting. The Full Moon Distortion also has a built-in Boost. It gives you an increase in volume (not distortion), and is perfect for solos. The Boost knob has a 0 to +12dB range, so you can dial up just the amount of volume boost you need. The boost also has a second smaller blue LED next to the Boost knob to let you know when it's active, and its own footswitch so you can turn it on or off at will. Limitations The boost on the Full Moon Distortion can not be switched for pre/post distortion engine operation like you can with the boost on the Santa Ana Overdrive - it's a volume boost only, and occurs after the distortion circuit. The Full Moon Distortion's boost section can not be used on its own, while the distortion is bypassed. You can turn it on or off so that it will be in one mode or the other when you turn the distortion back on, but you can not use it separately. Conclusions With three dirt pedals (not counting The Pelt fuzz) in the lineup, some players may be wondering which one is for them - as always, your own ears and tastes will be the ultimate guide, but each does have its own individual character and sound. The Santa Ana Overdrive is a true high-end overdrive pedal. The Pugilist Distortion straddles the line; it feels more like a dual-overdrive that can be driven well into distortion territory, while the Full Moon Distortion strikes me as more of a true, traditional distortion pedal - unabashedly and unapologetically high-gain, it leaves no doubt that it's a distortion pedal, with no pretense of being an overdrive. Hard rockers and metal guitarists will definitely want to check this one out! The Engager Boost is the pedal that I had hoped for when I was first checking out the Level Set Buffer, with not only a powerful EQ to adjust for tonal tastes or differences between guitars, but also the boost function and a nice onboard buffer, plus the ability to switch it to true bypass operation if you prefer. The Level Set Buffer will still be useful for many players, but those who seek a more traditional boost (that also includes a buffer if needed) will probably gravitate towards the Engager. I've always been a bit more of a fan of fuzz pedals than distortions, and the Pelt Fuzz just might be my favorite of the three pedals being reviewed this time around. With a wooly, thick and raunchy sound, it's bound to be a big hit with other fuzz-lovers too. I love the Bloom control and how you can get either smooth fuzz tones or more raspy ones from just this one pedal. If there's one thing that's notably absent from the new Fender pedal lineup, it's any kind of modulation pedals - there's a delay and a reverb, as well as a buffer, fuzz, and boost, plus your choice of three different overdrive / distortion pedals, but there's no chorus, flanger or phase shifter to be found. Hmmm…. maybe there will be a part 4 of this review series? Fender hasn't said anything suggesting that they're planning on releasing some modulation pedals to fill out the new line, but it would seem like a good idea, and I certainly hope they do because if the rest of the pedals in their new effects lineup are any indication, they're bound to be winners too. Even if you've been less than thrilled with some of Fender's previous pedal offerings, you owe it to yourself to give the new lineup a try - there's some seriously cool sounds to be found in Fender's latest offerings. -HC- Want to discuss Fender's new line of effects pedals, or have questions or comments about this review? Then head over to this thread in the Effects forum right here on Harmony Central and join the discussion! Resources Fender Engager Boost ($89.99 "street") Fender The Pelt Fuzz ($129.99 "street") Fender Full Moon Distortion ($149.99 "street") Fender Engager Boost product web page Fender The Pelt Fuzz product web page Fender Full Moon Distortion product web page You can purchase the Fender Full Moon Distortion from: Fender Sweetwater Guitar Center Musician's Friend You can purchase Fender's The Pelt Fuzz from: Fender Sweetwater Guitar Center Musician's Friend You can purchase the Fender Engager Boost from: Fender Sweetwater Guitar Center Musician's Friend Full Moon Distortion The Pelt Fuzz Engager Boost __________________________________________________ Phil O'Keefe is a multi-instrumentalist, recording engineer / producer and the Senior Editor of Harmony Central. He has engineered, produced and performed on countless recording sessions in a diverse range of styles, with artists such as Alien Ant Farm, Jules Day, Voodoo Glow Skulls, John McGill, Michael Knott and Alexa's Wish. He is a former featured monthly columnist for EQ magazine, and his articles and product reviews have also appeared in Keyboard, Electronic Musician and Guitar Player magazines.
 -
 Animals Pedal Tioga Road Cycling Distortion A bear on a bike? I smell a rat... by Phil O'Keefe Collaboration can be fun, and can lead to things that might not have happened if individuals (or companies) stuck to solo efforts. Case in point: the latest offering from Japan's Animals Pedal, a company I wasn't really familiar with previously, but that apparently has, in a few short years, built a reputation for making straightforward, great-sounding pedals without a lot of unnecessary frills. Animals Pedal was founded in 2015 (they were formerly known as Ninevolt Pedals), and in that time they've collaborated with a couple of big name boutique builders, bringing their designs to the market at impressively low price points. The Tioga Road Cycling Distortion - the distortion pedal we'll be looking at in this review - is another example of just that kind of collaborative effort. What You Need To Know The Tioga Road Cycling Distortion is a collaborative effort; while it is built in Japan by Animals Pedal, it was designed by Matthew Holl from California-based boutique pedal company Wren And Cuff. The Tioga Road Cycling Distortion is built into a small metal housing. It measures approximately 4.38" L x 2.35" W x 1.95" H. As far as I can tell, the pedal's weight isn't listed on the Animals Pedal website, but it feels substantial; it's a bit heavier than I was expecting based on the pedal's relatively small size. As with all of the Animals Pedal offerings, the graphics were created by Jonas Claesson. https://www.jonasclaesson.com/ The pedal itself is light blue, with black and white graphics. What does a bear on a bike have in common with electric guitarists? The only connection I can see is that both spend a lot of time stepping on pedals… The control labeling is done in white, which can be difficult to see against the light blue paint, but there's not a lot here to remember, so that's a minor annoyance at most. The bear-themed graphics themselves are rather unique (and apparently something Animals Pedal is known for) and while it's subjective, I like the overall look of the pedal quite a bit, even though the pleasant and fanciful image is rather incongruent with the sound of the pedal. The input and output jacks are mounted on the pedal's sides. The input jack switches the battery on when you plug in a cable, so be sure to unplug the input whenever you're not using the pedal to conserve battery life. The Tioga Road can be powered with either a 9V battery or with a external power adapter, but neither one is included, so you'll need to provide your own power source. The 9V power jack is located on the side of the pedal, next to the input jack. It uses the industry standard 2.1mm center-negative format. The 9V battery compartment is located inside, and is accessed by removing four screws and the pedal's bottom plate. There is a lot of similarities between this pedal and a classic Rat, but there are some differences too, with the Tioga Road featuring beefier lows and some slightly tweaked component values throughout the circuit. The biggest difference comes in the form of a three-way toggle switch that you won't find on the pedals that inspired this one. The toggle switch lets you select between two different types of diode clipping distortion (asymmetric and symmetric clipping) and also provides a third option that removes the diodes completely and lets the opamp take care of business by itself. This gives you a cleaner sound that is more like an overdrive rather than a more heavily distorted sound. This adds significantly to the pedal's sonic versatility and makes it better suited to a wider variety of musical styles and situations. Toggle switch setting 1 gives you the classic sound of symmetric clipping, while toggle switch setting 2 bypasses the clipping diodes and lets the opamp do the work alone for more of an overdrive sound, while the third switch setting calls up the asymmetric clipping option. There are three knobs on the Tioga Road Cycling Distortion pedal. All three are clear with black indicators. These aren't push-on type knobs, but are held in place with a small metal set screw. In case you're wondering, no, they're not illuminated knobs - there are no LEDs located beneath them, and they don't light up. The knob on the far left is a classic Tone control, which lets you roll off some of the highs to tame the edge of the distortion and make it a bit smoother sounding. At high Tone settings, the pedal has plenty of snarl and bite. The center knob controls Volume. At all but the lowest settings on the Distortion knob (below about 9 o'clock), there is plenty of volume available to get a significant boost above unity gain if you want. The knob on the far right is the Distortion control. The amount of distortion available and its general character will depend on where you have the three-way toggle switch set, but you can go from lightly overdriven to distorted to nearly fuzz-like sounds, depending on how you adjust the pedal. Switching is true bypass. A white LED to the left of the footswitch lights up whenever the pedal is active. Limitations The side mounted power jack that's closer to the front of the pedal than the rear can be a bit of a pain - especially if you use a daisy chain to power your pedals. I'm not sure if it contains the coveted LM308 opamp or not - I wasn't able to disassemble it far enough to get a view of all of the components. Conclusions I smell a dirty rat… and that's a good thing! But the fact is, this is really a different subspecies altogether. Sure, it can do all of the classic rodent type sounds that you're familiar with, but the addition of the asymmetric clipping option and the ability to defeat the diodes completely gives you sonic options that you won't find on the originals. I also really like Tioga Road's artwork. A cartoon bear on a bike? It's unique, and totally incongruent with the sounds the pedal makes, which is kind of fun in a twisted way… and it fits in with the Animals Pedal theme. But it's really just icing on the cake - it's the sound that matters most, and if you are looking for a classic rodent with a few new tricks up its sleeve, look no further. The Tioga Road Cycling Distortion gives you great sound, with bigger lows and added versatility thanks to the design tweaks by Matthew Holl. Animals Pedal bring their manufacturing prowess and efficiency to the collaboration, allowing you to get a boutique Wren And Cuff designed pedal at a very attractive price. Like I said, collaboration can be fun - and this one is a win for guitarists. What's not to love about that? -HC- Want to discuss the Animals Pedal Tioga Road Cycling Distortion pedal or have questions or comments about this review? Then head over to this thread in the Effects forum right here on Harmony Central and join the discussion! Resources Animals Pedal Tioga Road Cycling Distortion ($149.00 MSRP, $119.00 "street") Animals Pedal website Animals Pedal product web page Animals Pedal products are distributed in North America by SFM You can purchase the Animals Pedal Tioga Road Cycling Distortion from: Guitar Center Reverb Musician's Friend __________________________________________________ Phil O'Keefe is a multi-instrumentalist, recording engineer / producer and the Senior Editor of Harmony Central. He has engineered, produced and performed on countless recording sessions in a diverse range of styles, with artists such as Alien Ant Farm, Jules Day, Voodoo Glow Skulls, John McGill, Michael Knott and Alexa's Wish. He is a former featured monthly columnist for EQ magazine, and his articles and product reviews have also appeared in Keyboard, Electronic Musician and Guitar Player magazines.
 -
Music Association Thread - Take 3
Phil O'Keefe replied to Dendy Jarrett's topic in Sound, Stage, and Studio
[video=youtube;_h9MxNn8P7w] "Ramble On" - Led Zeppelin -
 Cort CJ Retro Does this acoustic-electric's value match its jumbo size and cool vintage vibe? by Phil O'Keefe Once upon a time an inexpensive acoustic guitar was really not something you'd wish upon anyone - especially not someone that you cared about who was just starting out on their guitar playing journey. Many a neophyte guitarist has been turned off by instruments that simply were too difficult for them to play because of high action or large, clubby necks. Fortunately, those days are behind us, and today, even relatively inexpensive models can provide you with not only a highly playable instrument to learn on, but also half-way decent sound quality and even built-in electronics so you can use the instrument for live performance once your skills have sufficiently improved. Case in point - the new Cort CJ Retro. Cort has expanded their CJ series of jumbo-sized acoustic guitars with this new and more affordable offering. The CJ Retro also sports some interesting cosmetic twists that make it stand out from other models in that series, and the end result will appeal not only to beginners and intermediate-level players, but possibly to some more advanced musicians too. Let's have a look at some of the reasons for that. What You Need To Know The latest addition to Cort's CJ series of jumbo-sized acoustic guitars, the CJ Retro has a large body (16.25" wide at its widest point, and 4.92" deep at its thickest point) that is obviously inspired by other big-bodied acoustic guitars such as the classic Super Jumbos. Only one finish color is offered - a dark sunburst that Cort calls Vintage Sunburst Matt. The finish is matte all the way around, from the top to the back, and including the neck. The top is laminated spruce. The top layer of the spruce laminate is smooth, and there is some slight grain and silking visible, but no open pores. The black part of the dark sunburst covers the majority of the top, with a nicely done "fade" to the lighter areas toward the bridge and soundhole, which are more of a lighter brown on the review model than the more yellowish shade shown in some of the Cort website photos. The body's back and sides are made of laminated mahogany. The top layer of the laminate is finished without the use of grain filler, so there's considerable grain and open pores visible in the wood's satin mahogany finish, as well as some attractive figuring that adds to the guitar's visual appeal. Both the top and back of the CJ Retro are bound with white and black plastic binding. The CJ Retro's soundhole rosette decal has a similar appearance, with alternating rings of white and black. The bridge is made out of merbau wood, a species that, like rosewood, is considered threatened, but it was no doubt selected due to the lack of any current restrictions on its importation. The bridge has been stained in a way that makes it look very similar to rosewood. The CJ Retro has a compensated saddle. The bridge pins are white plastic with black dots. The white truss rod cover and pickguard really jump out at you - I suspect people will either love or hate that aspect of the design, but I think it adds to the vintage look of the guitar; it kind of reminds me of some old Harmony and Stella guitars in that respect, although the Cort CJ Retro is a much more modern and better-built instrument than any Harmony I've played. The neck is mahogany. It is attached with a dovetail joint, and it meets the body at the 14th fret. There are a total of 20 frets, which are vintage sized. The CJ Retro's scale length is 25.5". The neck measures 43mm (1 11/16") wide at the nut, and is 0.825" (20.95mm) thick at the first fret. It has a very comfortable c-shaped profile, with a slim and fast feel that many beginners and folks with smaller hands will appreciate. The headstock is adorned with a simple diamond emblem and the Cort logo - both appear to be decals, as opposed to inlays. The neck is bound, with black side dot position markers on one side. The frets are installed over the binding. The fretboard is also made out of merbau. It's an attractive wood that has a look that is slightly reminiscent of rosewood, but it's lighter, with even more prominent (and darker colored) grain and pores, giving the fretboard of the CJ Retro a very cool and distinctive look. The CJ Retro comes equipped with light gauge (.012-.053) D'Addario EXP16 phosphor-bronze strings. Since these are coated strings they will tend to last longer than traditional strings, which means the guitar keeps sounding good for longer, and won't require a string change as quickly as a guitar with uncoated strings would - all of which is beneficial for a beginning guitarist. Another nice vintage-inspired touch are the double rectangle fret position inlays. Cort says that they were specifically designed for the CJ Retro, and they really do look like something you'd see on a fifty year old guitar, even though it is a brand new design created specifically for this guitar. The material looks like mother of pearl, but it is most likely acrylic. The tuners are open-backed and have off-white colored buttons - both of which add to the retro vibe. the gear ratio isn't mentioned on the Cort website, but from my testing it appears to be roughly 18:1. I've always been a bit wary of open-backed tuners, but these seem to operate smoothly, and the CJ Retro's tuning stability is good. The Cort CJ Retro is a acoustic-electric guitar, and comes equipped with a Fishman Neo D magnetic acoustic pickup mounted across the soundhole, and Fishman VTB active preamp. The three controls for the Fishman VTB preamp are top-mounted. The three controls allow you to adjust the volume as well as treble and bass, and they come equipped with amber "top hat" style knobs. The electronics are powered by a 9V battery. The battery compartment is located on the side of the guitar towards the rear; not too far from the strap button. This is also where you'll find the CJ Retro's output jack. Not having to reach inside the guitar to change the battery is always a plus in this reviewer's opinion. The Fishman pickup and electronics sound good and work well together. They give the CJ Retro live performance and direct recording capabilities that many entry and intermediate level acoustic guitars lack. Limitations Two of the open-backed tuners (the one for the low E string, and especially the one for the G string) were mounted crookedly compared to the others. They still work fine, and you probably won't notice when looking at the guitar from the front, but when viewed from the rear, it's fairly obvious. The tone of guitars that are made with laminated wood (like the CJ Retro) usually does not improve as much with age as the sound of guitars made from solid woods do. Laminated wood tops don't resonate as freely as solid wood tops do. While it is a surprisingly good sounding guitar with an attractive and loud voice, the CJ Retro still retains some of the tonal characteristics of a laminated wood guitar, which will make it less desirable to more advanced players who are looking for a higher-end instrument. Unlike some acoustic-electric instruments, there is no tuner built into the electronics - beginners should budget for a stand-alone or clip-on electronic guitar tuner to go along with their new CJ Retro. And don't forget to pick up a bag or case for it too - neither is included with the CJ Retro. Conclusions The visual appeal of this guitar is very strong. Not only the overall retro vibe, but also the appearance of the wood and the overall approach to the finish that Cort decided on - it's a satin finish and it's still laminated wood, but the top layers actually look quite nice, and the sunburst finish is very attractive. However, the laminated construction is probably the guitar's biggest limitation - unlike guitars with a solid wood top, the tone of the CJ Retro is probably not going to change for the better in any significant way as time passes. There is a touch of the restrained and constricted sound to the tone that one often associates with guitars that use laminates, especially laminated tops like the CJ Retro has, with more of the note fundamental present and fewer complex overtones. Still, don't discount laminates entirely - they can be made to sound nice (as is the case here) and they have significant durability advantages. Because of that, the Cort CJ Retro is a good choice not only for a beginner who may not know (or may not be consistent about) the details and importance of taking care of a solid-wood guitar, but also for intermediate players looking for their first acoustic-electric, and even for more experienced players who want a nice playing, loud, and decent sounding knockabout guitar for campfire sing-alongs and trips to the park, beach, desert, or other environmentally challenging locations. If you want a similar guitar with a solid wood top, check out the other guitars in Cort's CJ Series - the CJ1F NS and the CJ3V. Both feature solid spruce tops. The sample CJ Retro that I was sent to check out plays surprisingly well, and required zero adjustment. It was ready to be played, straight out of the shipping box - and that's important for beginning players who really don't know what to seek in terms of playability. The action is neither too high or too low, and the intonation was good too - no doubt helped by Cort's decision to use a compensated bridge. While the tuners look like they were installed in a hurry and without much consideration for their alignment, they work smoothly and the guitar stays in tune reasonably well, which will also be beneficial for beginners. And the tuning key misalignment was really the only thing about the construction that bothered me - outside of that, the guitar seems to be well built. I let a few of my guitar-playing friends try the Cort CJ Retro and asked them what they thought. Everyone said it was a nice playing and attractive looking instrument with an appealing sound and loud voice. One guessed it was priced in the $500 range, while another thought it was probably closer to $600 - which is twice as much as the CJ Retro's actual MSRP. Translation: The Cort CJ Retro represents a very good value. While it is definitely priced towards the affordable end of the price range, it isn't cheap - it's not going to handicap beginners with extra challenges as they're trying to learn how to play. If you are looking for a first guitar (either for yourself or as a gift for someone else), your first acoustic-electric guitar, or just a guitar that you can take practically anywhere and not have to worry too much about it, it's definitely worthy of your consideration. I'm more than a little tempted to purchase the review unit for myself - yes, I've become rather attached to this guitar, and that's always a good sign. If you get one, I suspect you'll quickly be won over by its charms too. -HC- Want to discuss the Cort CJ Retro acoustic electric guitar or have questions or comments about this review? Then head over to this thread in the Acoustic Guitar forum right here on Harmony Central and join the discussion! Resources Cort CJ Retro jumbo acoustic-electric guitar ($299.99 MSRP, $289.89 "street") Cort's product web page You can purchase the Cort CJ Retro from: Amazon Reverb __________________________________________________ Phil O'Keefe is a multi-instrumentalist, recording engineer / producer and the Senior Editor of Harmony Central. He has engineered, produced and performed on countless recording sessions in a diverse range of styles, with artists such as Alien Ant Farm, Jules Day, Voodoo Glow Skulls, John McGill, Michael Knott and Alexa's Wish. He is a former featured monthly columnist for EQ magazine, and his articles and product reviews have also appeared in Keyboard, Electronic Musician and Guitar Player magazines.
 -
Music Association Thread - Take 3
Phil O'Keefe replied to Dendy Jarrett's topic in Sound, Stage, and Studio
[video=youtube;97EjHX63ZRQ] "Tiger In My Tank" - My Bloody Valentine -
If you're going to tune down, then heavier strings are usually considered to be a good idea due to the string tension issues that come along with that. If not, you can stick with whatever gauges you usually use on a non-Floyd equipped guitar.
-
Music Association Thread - Take 3
Phil O'Keefe replied to Dendy Jarrett's topic in Sound, Stage, and Studio
[video=youtube;WOP6R3JvNHg] "Positively 4th Street" - Bob Dylan -
 Just how good can a $200 analog synth really be? Most musicians will no doubt be familiar with IK Multimedia. A software powerhouse, they offer recording and virtual instrument apps for tablets and computers, studio plugins for use with your DAW, as well as a variety of hardware products too, including MIDI controllers and an assortment of recording products and other problem-solvers; many of which we've reviewed here on Harmony Central. But they haven't really offered anything in the way of hardware instruments - until now. Their new UNO Synth is surprisingly affordable at just under $200, but just how much analog hardware synth can you expect to get for the price of a plugin or effects pedal? What You Need To Know The IK Multimedia UNO Synth is a monophonic analog synthesizer; its two oscillators, noise generator and resonant multimode filter are all analog. It has a wealth of features that you might not expect, especially in light of its very affordable price. Made in Italy and designed by IK's Erik Norlander in conjunction with Italian boutique synth manufacturer SoundMachines, the UNO Synth is IK Multimedia's first hardware synthesizer. It's housed in a plastic case, but it seems reasonably durable, and it is certainly light and compact, weighing only 0.88 lb. and measuring 10.1" W x 8.9" D x 1.93" H. The power switch is mounted on the rear. UNO can be bus powered over USB (including from USB power banks and chargers), or it can be battery-powered with four AA batteries - a set of batteries are included, so you can get started using UNO Synth right out of the box. UNO Synth self-calibrates for a minute or so when you first turn it on. This not only gets the user interface ready to go, but automatically tunes the synth's oscillators, so you never have to worry about oscillator drift and being out of tune. The UNO Synth uses a smaller sized micro USB port and a short micro USB cable is included. MIDI over USB is supported. MIDI in and out jacks are also included on the rear panel. These use 2.5 mm TRS jacks. Two short 2.5 mm TRS to 5 pin DIN MIDI breakout cables are included, so you can easily use UNO with any keyboard or controller that has standard MIDI jacks. Also on the rear you'll find an 1/8" output jack for connecting to external mixers. You can also plug a pair of headphones or ear buds in here too. Additionally, an 1/8" audio input is also provided. This allows you to daisy chain external audio sources and run them through the UNO, but unfortunately you can't use UNO's filter or amplitude envelope to process external sounds. The top panel "buttons" use capacitance sensing technology that works similarly to a modern tablet, although the top surface is plastic, not glass. The interface is very responsive to touch without being overly sensitive - it responds reliably and the way that you'd expect it to. Most of the buttons have LEDs that illuminate when they're selected, and while UNO's three alphanumeric character LED data display is rather sparse, it, along with the other LEDs provides all of the user feedback that you really need. The layout of the top panel is well-organized in a way that is very logical and easy to figure out if you're familiar with subtractive analog synthesis, and yet it's not going to be too intimidating to those who are less familiar with synths. Here's a graphic from IK Multimedia that shows the layout and what various things do very clearly. The ARP, SEQ, Preset, and Data ^ and v (up and down) buttons on the right are major parts of the user interface, and while there isn't a data wheel or knob that you can use to quickly scroll to the value you want, pressing and holding either the up or down button causes the value of the selected control or function to jump in large increments, while single, shorter taps give you fine control. It works nearly as fast as a knob and very intuitively. Also on the right you'll find three knobs with dedicated functions - a Volume control, the (Filter) Cutoff knob, and a Tempo knob that controls the internal clock for UNO Synth's sequencer and arpeggiator. The bulk of the synth's controls are adjusted using the four knobs on the upper left. These are used along with four touch-buttons on the far left side labeled OSC, Filter ENV and LFO. Each of these buttons has a row of labels that correspond with the four knobs above them. This 4x4 layout allows you to use four knobs to control multiple parameters. The two analog VCO's (voltage controlled oscillators) feature fully variable waveforms, so you can gradually transition from a triangle to a saw to a square or pulse wave and all points in between, giving you a wide range of waveform options. Pulse width modulation is also available, and you also get an independent noise generator too. Oscillator parameters can be controlled by pressing the OSC button and using the four knobs. The top panel labels in the OSC row indicate what the knobs directly above them will do when the OSC button is selected. Pressing the OSC button and holding it for a moment causes the red LED next to it to flash; this indicates that that row's alternative functions are selected and can be edited using the knobs. In this case, the alternative functions (also listed on the top panel) are mixer-related, and allow you to adjust the volume of the noise generator and the two oscillators. In the Filter row you have options for editing the 2-pole 12dB/octave resonant multimode filter's Mode (with high pass, band pass and low pass options), Resonance, Drive and Envelope Amount. The filter isn't the most unique sounding one I've ever heard, but it sounds good and it is versatile, and the filter's Drive control allows you to get some grit and grind happening if you want, which can really help thicken things up. The LFO has several waveform options, including sine, triangle, saw up, saw down, square, random and sample and hold. You can apply the LFO to oscillators or the filter if you wish. The LFO can also be synced to the clock so that it runs in sync with the selected tempo. UNO Synth has two envelopes. Looking at the ENV row you might think you can only adjust Attack and Decay for the Filter envelope, and Attack and Release for the amplitude envelope, but UNO Synth actually has a separate ADSR for each. You can access these using MIDI CC commands or with IK Multimedia's free UNO Synth software editor. You can also use the top panel to adjust all four stages of each envelope using the press / hold technique; press and hold the ENV button until the LED next to it flashes to assign all four amplitude envelope stages to the four knobs, and do the same with the FILTER button to assign the filter envelope ADSR to the four knobs. Since this was added with a post-release firmware update these alternate functions are not listed on the top panel, but it's still nice that IK Multimedia added them. UNO Synth has five preset performance buttons that apply "effects" or "articulations" to a sound. These can be instantly applied to a sound that is playing by pressing and holding their dedicated front panel buttons. You can't edit the parameters for the amounts of these effects from the front panel, but you can easily do so using the software editor. Effects include Dive, Scoop, Vibrato, Wah and Tremolo. A Hold button is also included which can sustain sounds that are playing in a manner similar to a sustain pedal, freeing up both hands for other tasks. The 27 note "keyboard" has an LED for each one of the keys to indicate when it is pressed. It also has 13 different scale options, making it easier to play without making mistakes, even on the smaller than normal keys. While fairly small, I was impressed with how playable the keyboard actually is. The keyboard and the corresponding LEDs for each key also serve double duty as a display and interface for the step sequencer. UNO Synth can store 100 presets. Presets 0-19 are the factory sounds and can not be overwritten, while users can save their patches to and overwrite the remaining 80 preset locations - all of which come with various sounds pre-loaded from the factory. UNO Synth has a delay effect built-in which can add to the rhythmic complexity of sequenced and arpeggiated patterns. The Delay has only Time and Mix controls, and the Delay's feedback is also controlled by the Mix knob. Higher Mix settings give you more regeneration, but you can't set it independently. The built-in sequencer is only a single measure / 16 step affair, and sequences can not be chained to form songs, although you can switch patches (and thus sequences) while the sequencer is running. Each patch memory location has its own dedicated sequence. Both step and real time sequence recording methods are supported. Even more impressive is UNO's ability to record parameter changes into the sequencer, giving you the ability to subtly or drastically change sounds as the sequence plays. There is also an arpeggiator included. It can operate over a four octave range, and has ten modes. All the usual modes that you'd expect (up, down, up/down, etc.) are avaliable. While the sequencer and arpeggiator don't allow you to transpose, they send out both MIDI notes as well as CC data, so UNO Synth will partner well with your DAW. MIDI CC data can also be used to adjust any of the UNO Synth's parameters, and UNO also transmits and locks to MIDI clock. Speaking of DAWs, IK Multimedia has also released a UNO Synth editor. It's available for Mac, PC and iOS, and it can run as a stand-alone application or as a DAW plugin. The UNO Synth Editor gives you a full-sized GUI with full control over all of UNO Synth's parameters, and allows you to offload and store patches and sequences. While UNO Synth comes with a multi-language quick start guide on a large fold-out sheet of paper, the text is very small - you're better off downloading the user manuals for the synth and the editor. See the Resources section below for direct download links. Also be sure to check out IK Multimedia's growing library of tutorial videos, some of which are also shown below - they'll give you a good idea of what it's like to use UNO Synth. Limitations You'll need an Apple Lightning to USB adapter ($39 "street" for the USB 3 version) to connect UNO Synth to your iOS device, and even with a Lightning cable feeding power to the adapter, UNO isn't bus-powered when connected to an iOS device - you'll need to use batteries to power the UNO Synth when using it with your iPad or iPhone. The filter on UNO Synth can not be driven to self-oscillate. There's no oscillator sync. There is no transpose function for the sequencer and arpeggiator. This isn't going to be an issue if you want to dump the various sequences you create (or the factory sequences) into a DAW and transpose them there, but it is a serious limitation for live performance. There isn't a knob for each and every function on UNO, and while most (about 40!) can be, not all functions can be edited and adjusted from the hardware itself; some (such as keyboard tracking for the filter, pitch bend amount, the amounts for the front panel performance effects buttons, etc.) require the use of the free Editor software or the use of MIDI CC messages to adjust. But remember - this was designed to be a highly portable, lightweight synth that would appeal to both experienced and novice users alike - and a knob per function interface would add significantly to its size and weight, while possibly appearing more intimidating to inexperienced users. The placement of the Filter Cutoff and Volume knobs right next to the Tempo knob means you can wind up with unintended / accidental changes to the tempo if you're not careful. The UNO Synth can respond to velocity control received over MIDI, but the built-in keyboard isn’t velocity sensitive. Conclusions With two voltage controlled oscillators, a noise generator, multimode VCF, multi-waveform LFO, filter and amplitude envelopes, delay, sequencer, arpeggiator and a really appealing sound… what's not to love? Well, if you look at the limitations I mentioned above, it looks like there are a few things on the list, but remember, this is a $200 analog hardware synth we're talking about here - the fact that the IK Multimedia UNO Synth sounds so good and includes so much at that price point is pretty amazing. And they say they're not finished with it either. Since its initial release, IK Multimedia has taken customer feedback to heart and have released not only firmware updates, but also the free software editior... and may continue to make further improvements based on the user feedback they get. Probably the omission that bums me out the most is the lack of any way to transpose the sequences while they're playing back - hopefully IK Multimedia will consider adding that capability in a future firmware update. It would add significantly to the UNO's capabilities - especially for live performance use. The user interface may not have one knob per function, but in actual use the control arrangement is quick and easy to get around on, making it a nice compromise between a single data entry knob and a more knob-rich (and more expensive) user interface, and it certainly helps it to be a smaller, lighter, more compact and mobile-friendly synthesizer. Some users might wish for a data knob, but the auto adjusting response of the Data Up / Down buttons to the length of your touch works very well. In fact, the way the interface responds overall is actually much better than I was expecting, and it's obvious that a lot of thought went into the design of this synth - both sonically and from a user interface standpoint. Even though I prefer using an external MIDI keyboard to control the UNO Synth, the built-in touch keyboard is actually quite usable, and with all of the various scale options, it is super-easy for even complete novices to perform on it without hitting a ton of bad notes. UNO Synth's MIDI implementation is also excellent - whether you want to use one of the free, comprehensive and well-designed software editors or MIDI CC commands, UNO has you covered and lets you easily control everything. You can also send sequences into your DAW over MIDI, and lock it to your DAW using MIDI clock, so it is very studio-friendly too. IK Multimedia's UNO Synth is an impressive achievement. Its big beefy analog sound and wealth of features would be right at home on a synth costing twice as much - the fact that they're selling this very smartly-designed Italian-built synth for just under $200 is pretty incredible. You really do get a lot of analog synth for the money with IK Multimedia's UNO Synth. Whether you are looking for your first synth, want to add to your existing stage or studio rig, or you're in the market for a full-featured analog monophonic synth that you can take with you just about anywhere, UNO Synth is a synth that you need to add to your short list. Regardless of what else you may already own, you're going to want one of these surprisingly inexpensive, great-sounding and very cool little analog hardware synths. -HC- Want to discuss the IK Multimedia UNO Analog Synth or have questions or comments about this review? Then head over to this thread in the Keys, Synths & Samplers forum right here on Harmony Central and join the discussion! Resources IK Multimedia UNO Synth ($199.99 "street") IK Multimedia's product web page UNO Synth manual (PDF file) UNO Synth Editor software manual (PDF file) UNO Synth quick start guide (PDF file) You can purchase the IK Multimedia UNO Synth from: IK Multimedia's Online Store Sweetwater Guitar Center B&H Photo Video Musician's Friend Tutorial Videos: Getting around the synth The sequencer The oscillators The filter section Additional UNO Synth tutorial videos can be found . __________________________________________________ Phil O'Keefe is a multi-instrumentalist, recording engineer / producer and the Senior Editor of Harmony Central. He has engineered, produced and performed on countless recording sessions in a diverse range of styles, with artists such as Alien Ant Farm, Jules Day, Voodoo Glow Skulls, John McGill, Michael Knott and Alexa's Wish. He is a former featured monthly columnist for EQ magazine, and his articles and product reviews have also appeared in Keyboard, Electronic Musician and Guitar Player magazines.
 -
Music Association Thread - Take 3
Phil O'Keefe replied to Dendy Jarrett's topic in Sound, Stage, and Studio
[video=youtube;BUt0dZXPFoU] "Street Fighting Man" - The Rolling Stones -
Music Association Thread - Take 3
Phil O'Keefe replied to Dendy Jarrett's topic in Sound, Stage, and Studio
[video=youtube;Bm8yTcgY-bE] "Buenas Noches From A Lonely Room (She Wore Red Dresses)" - Dwight Yoakam -
Music Association Thread - Take 3
Phil O'Keefe replied to Dendy Jarrett's topic in Sound, Stage, and Studio
[video=youtube;mlOVlqUcB8A] "In A Lonely Place" - The Smithereens (with Suzanne Vega)


