


kwakatak
-
Posts
17,602 -
Joined
-
Last visited
-
Days Won
1
Content Type
Profiles
Articles
News
Expert Reviews
Forums
Posts posted by kwakatak
-
-
1 hour ago, daddymack said:
looks almost like a guitar!

fretboard looks good...bridge... where's that bridge...?😉
Don't worry. I have a Martin style ebony bridge. It goes on after I apply finish, but I'll be using it to make mask before that point. I just don't have a saddle for it yet! I figure I can either order it from Martin or buy a blank from StewMac.
-
The channels are looking good. The purfling could sit a little lower so I'm going to just deepen the purfling stair step with a file but the bindings and purfling are trimmed to length.

-
 3
3
-
 1
1
-
-
14 hours ago, daddymack said:
great match with the rosette!
Where are you off?

I was .1mm shallow on the binding channels but I went back yesterday did another pass. Now everything is flush. I still have to fine sand everything but at least now I don't have to worry about chipping out curly maple.
Now I'm on to mitering the purfling at the end wedge and dry fitting the binding so that I know how short to cut each binding so that there are no gaps. It's anal retentive work and I am no tightass.
-
1
-
-
I bought prebent herringbone purfling from Stewmac and bent the bindings the other day. The day before yesterday I spent measuring and a good hour carefully routing out the channels. Things came out okay (not a lot of tear out) but I have to give it another pass because I'm .1" off. Such is the way of things.
-
29 minutes ago, daddymack said:
You learned...that's what it is all about. You will learn even more from doing this one.
And in back of all the worry, and the hard work...is the joy of discovery and achievement.
No one woke up one morning and said 'Gee, I think I will make a guitar!', and does it, and succeeds by that evening.
Not even Harmony Central Moderators....😉
Yup. I've been fiddling with my homemade binding cutter jig and working on leveling the sides. I need to tweak the jig so that I can get a nice square angle on it. Meanwhile, the sides are slightly cupped in areas and my prevoius attempt at using a sanding spindle has left some flat spots that I need to curve. It's hard to explain but I need to have the sides smooth along the surface, perdendicular to the axis of the bit and flat from back to front so that the jig has a good reference for the guide to follow - otherwise the binding isn't going to fit flush in the channel.
-
1
-
-
11 hours ago, DeepEnd said:
Very nice. I very much approve. 😉 Seriously, it looks very much as it should. Looking forward to journey's end.
I can't be confident until the binding is on. I had a rough time of it on the last one.
-
-
3 hours ago, daddymack said:
Heat gun?
No. Nylon heating blanket that can go over 300 degrees. A heat gun is more useful for repairs where you have to soften the glue. I also learned a neat trick about using a clothes iron and a damp rag to steam out dings in bare wood. Thankfully I haven't had to put the fire pit to use yet!
-
4 minutes ago, daddymack said:
Tape? This is the digital age!

Well to be honest I didn't want to use vinyl because it could gum things up if I expose it to heat.
I could go old school and use a hot pipe and a propane torch but the binding is curly maple and splits really easily. Using the bending machine I used to bend the sides seems safer that using an open flame too.
-
The back is on. I'd hoped to tape up the 4 binding strips together so that I could bend them on my DIY bending machine - but I don't have any g******* tape!
ALl the more reason to go to the local Woodcraft tomorrow and see if they have anything I could use.

-
 1
1
-
-
My wife had to fly to Carlsbad CA this week for work and my 16yo passed his driver’s test so I’ve been throwing myself into this this week. I think I’m ready to close the box today before it becomes Friday the Thirteenth. I’ve been watching Robbie O’Brien videos for LMI for how to glue down the back and a complete build video by Michael Bashkin for StewMac. I’ve whittled away at the mass on the back plate and braces and the last dry fit shows promise. Let’s go!
-
1
-
-
Lol. FWIW patience comes naturally for me because I’m a chronic procrastinator.
I have plans to do another 3 in the coming years:
- a Martin-style 00-18
- a Martin style HD-28 with an Adi top
- another medium jumbo like my first two, but with a cedar top, EIR back and sides and a cutaway. I have to make a new bending form though for the cutaway
Along the way I’ll be refining the process to forestall making the same mistakes. I’ve also started keeping a spreadsheet for No. 4 so that I can track the costs of materials. I don’t know what to charge but it’ll be a couple of years before I have something I’d feel comfortable charging more than cost of materials
…but I’m getting ahead of myself I spent less than an hour chiseling off that brace and another glue making the replacement. The plan for tomorrow is to glue it on once the surfaces are prepped for gluing
-
1
-
-
1 hour ago, daddymack said:
Looks like you got it about right now.
Are you replacing the two lower braces, or the two outermost to accommodate the glue block arc??
Just the one closest to the tail block. I only have enough wood for that.
I need to stock up on materials and may buy 3 billets of brace wood. I'm geared up to cut my own braces now; table saw, band saw, drum sander. radius dish, etc. .
-
1
-
-
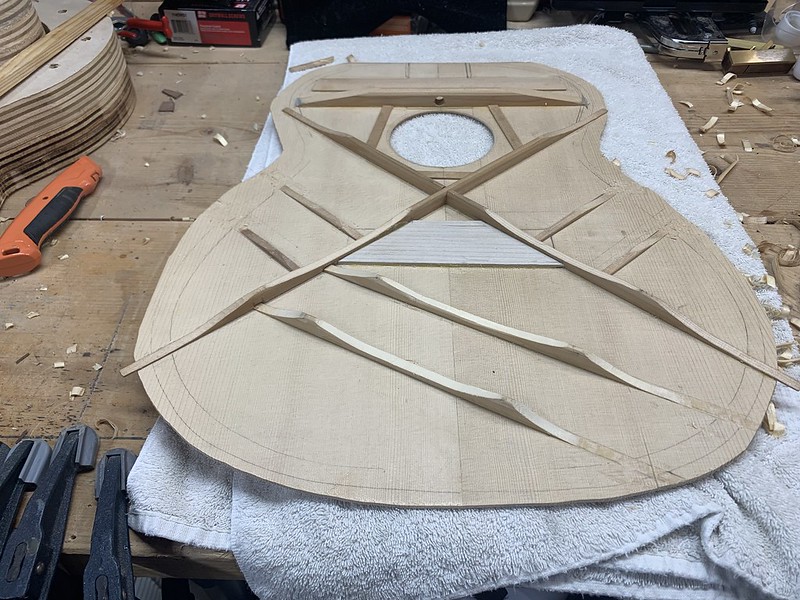
So I’m cutting a new brace with a 15’ radius and sanding the underside on the radius dish so that it creates a decimation along the length of the plate in that area
-
I’m working the problem. I have a little bit of spare brace stock; enough to make one brace. I need the back to deform most around the tail block, so I will replace the largest ladder brace in that area.
Here are pics of the problem:
Note the arc on the glue surfaces of the neck and tail blocks yet the length of the back is straight.
-
8 hours ago, daddymack said:
we are here for you!
lol @ 'potato chip'.....

you are welcome to 'blog'....ain't much else going on here...I have my own 'blog' thread in 'Cool Jam'

Yeah, "potato chip"; it's only bent one way because I didn't sand the underside of the braces on a radius dish. I need to replace at least two of the four ladder braces on the back and sand their undersides so that they bend the back toward the blocks inside the body.
-
I’m kicking myself for not buying the radius dish sooner. The back needs to be a dome but it’s a potato chip that I don’t want to crumble under the stress. OTOH stress = tension and tension = tone
I know I’ve been at this awhile guys, but thanks for the likes. It encourages me to push through this. I know I’ve been treating this thread like a blog but really it’s been a journal where I can think things out through the writing process. I need to do that someplace else, like Instagram or YouTube or Wordpress. I do this here because of the community, such as it is.
-
1
-
-
I’m dry fitting the back to see if I need to address any high spots.
-
1
-
-
I cleaned up the rough carving on the braces. Here’s a picture of the boat:
Here are all the bits and pieces. The back goes on next.
-
3
-
-
Pics or it didn’t happen I suppose! I took videos of the occasion too so you get to see my indecisiveness in action. I need to edit them though.
-
4
-
-
I went with the terry cloth patch and the tap tone was strong. I glued the soundboard on to the sides this evening.
-
2
-
-
In order to attach the top I have to make grooves in the sides where some of the braces will pass through and lock the top into position. Using the flashlight on my cell phone and sticking it in the soundhole i did a dry fit with go bars to hold the top in position but I was still getting gaps. I’ve addressed that but have one more thing to do…
There’s a gap in the lap joint on the main X brace that I’m concerned will be a weak point and I’m searching online for a solution. This differs from my first two when I carved the profile of the braces after gluing them to the top
One solution is to saturate a patch of terry cloth with AR glue. This is what older Martins have. Another is to create a putty out of wood and fill the openings, then glue a piece of spruce atop the gap the reinforce it - just as I did with my first two.
Which do you prefer? I’m leaning toward the cloth and a wooden cap. It would affect the tap tone though and I like the this top rings right now.
-
OK, I did it. The tap tone is noticeably lower in pitch but still has a bit of sustain. This is by no means a scientific observation. Pay no attention to the split in the top down by the lower face tone bar...it'll close up!😢
I feel like I went too low but I'm moving forward when time permits and intend to get more practice in. I don't think I'd get preshaped bracing again. I need to glue in a piece of cloth on the lap joint on the X brace. On my first two I started with a squared profile and put a piece of wood over the lap joint.
All in all, I'm telling myself that there's only room for improvement with future builds and I need to build more after this to get practice in order to build discipline in my process and confidence in my abilities.
-
1 hour ago, daddymack said:
how much scalloping were you considering?
I learned many years ago that less is often actually more, in many things, but I do not build acoustic guitars [I just fix them...and even that only up to a point]
I also learned many years ago that wood chisels can be potentially hazardous to the user and the usee....and unforgiving.
This is your build, and my intent was not to rush you to complete, but to continue on with the process.
I have the StewMac plans for the 00 and 000 - and the herringbone dread somewhere around here, as well as the Medium Jumbo plans that I used for Nos. 1 & 2. The 000 plans don't have a profile of how the braces should be scalloped but the 00 plans do and the height of the low point of the scallop is 7mm. The difference is that the 00 is only 14" across the lower bout whereas the 000 is 15" so I have to guesstimate.
I hear ya though: too much talking, not enough doing!
-
1
-


Build #3 - Martin-inspired 14 fret 000 Black Walnut
in Acoustic Guitars
Posted
I’m BTW I’m hoping that this relatively quick progress builds momentum. In hindsight a big part of that was me making my own shooting board, side bending apparatus, drum sander and binding channel cutting guide. I’ve been collecting materials, acquiring plans and building templates for the next one, keeping an inventory and documenting the process so that the the process goes even more smoothly. The big difference for the next one is that I actually have to build and carve the neck.